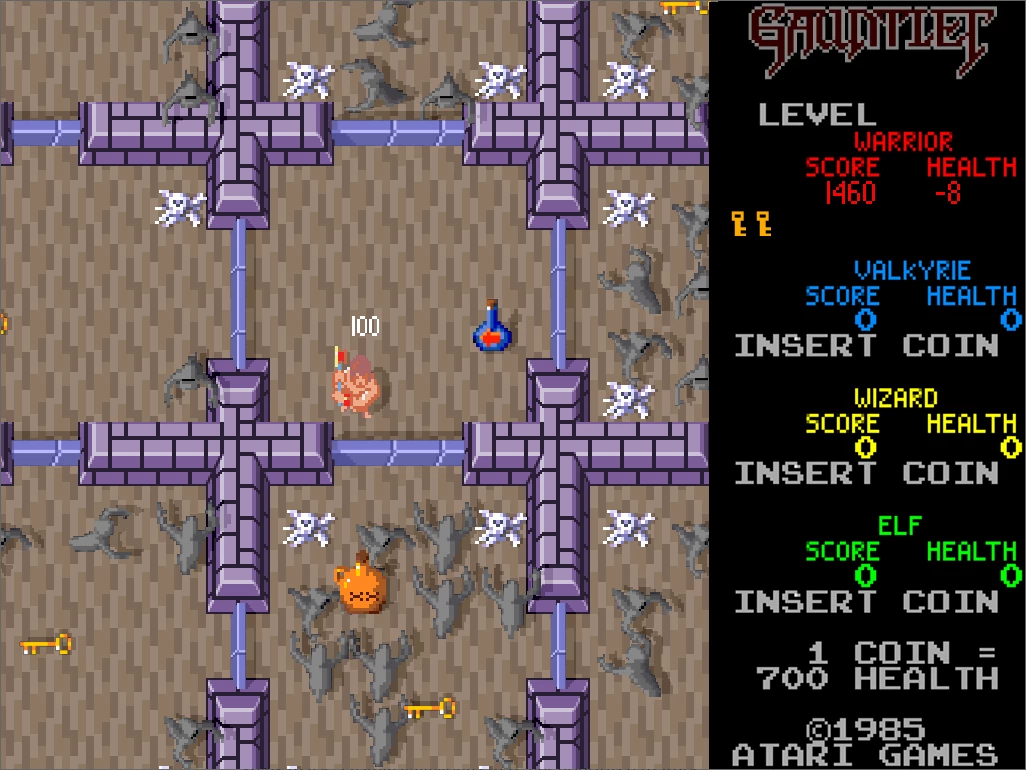
For this project, I was assigned with creating the core functionality of the popular retro game, Gauntlet! I decided to try and recreate as many different features as possible.
This was my first time properly using C++, and a custom SDL engine to try and recreate a retro game. The framework that provides basic rendering was provided by my school.
The end result is a fully playable Gauntlet game, with many of its features implemented exactly as how they work in the original game!
I learned that Gauntlet holds a lot of detail in even the smallest features, which I enjoyed a lot to properly recreate.
Below I try to explain my thought process and go a bit more in depth on how I tackled recreating specific functionality and features:
note: I am still working on adding more documented code and feature explanation sections.
▌Specifications:
Project type: Buas school project Released: end of 2020 Platform: PC, Windows Time spent on project: 6 active weeks, 1 year of small improvements Engine and Tools: SDL 2.0 custom 2D engine - C++
▌My contributions:
○ Gameplay research ○ All features and programming ○ All documentation ○ All asset preparation and implementation
▌Project goals:
○ Lean using C++ ○ Learn more about SDL ○ Create a fully working replica of Gauntlet
As a student, I was tasked to produce a version of the classic multiplayer game Gauntlet, (youtube link) from Atari 1985.
"All the game logic must be map based, rendering should be separated from the main gameplay logic. Display a scrolling map area, which is variable in size. Take note of the generation of characters, their movement. animation, and attack patterns. The original game allowed for multiple players, however we do not require you to do that. Students should take note of the difficulties of spawning new characters and removing them from the game when killed. students should also take note of the increase in collision tests required and provide a means to minimize this with a suitable broad phase system"
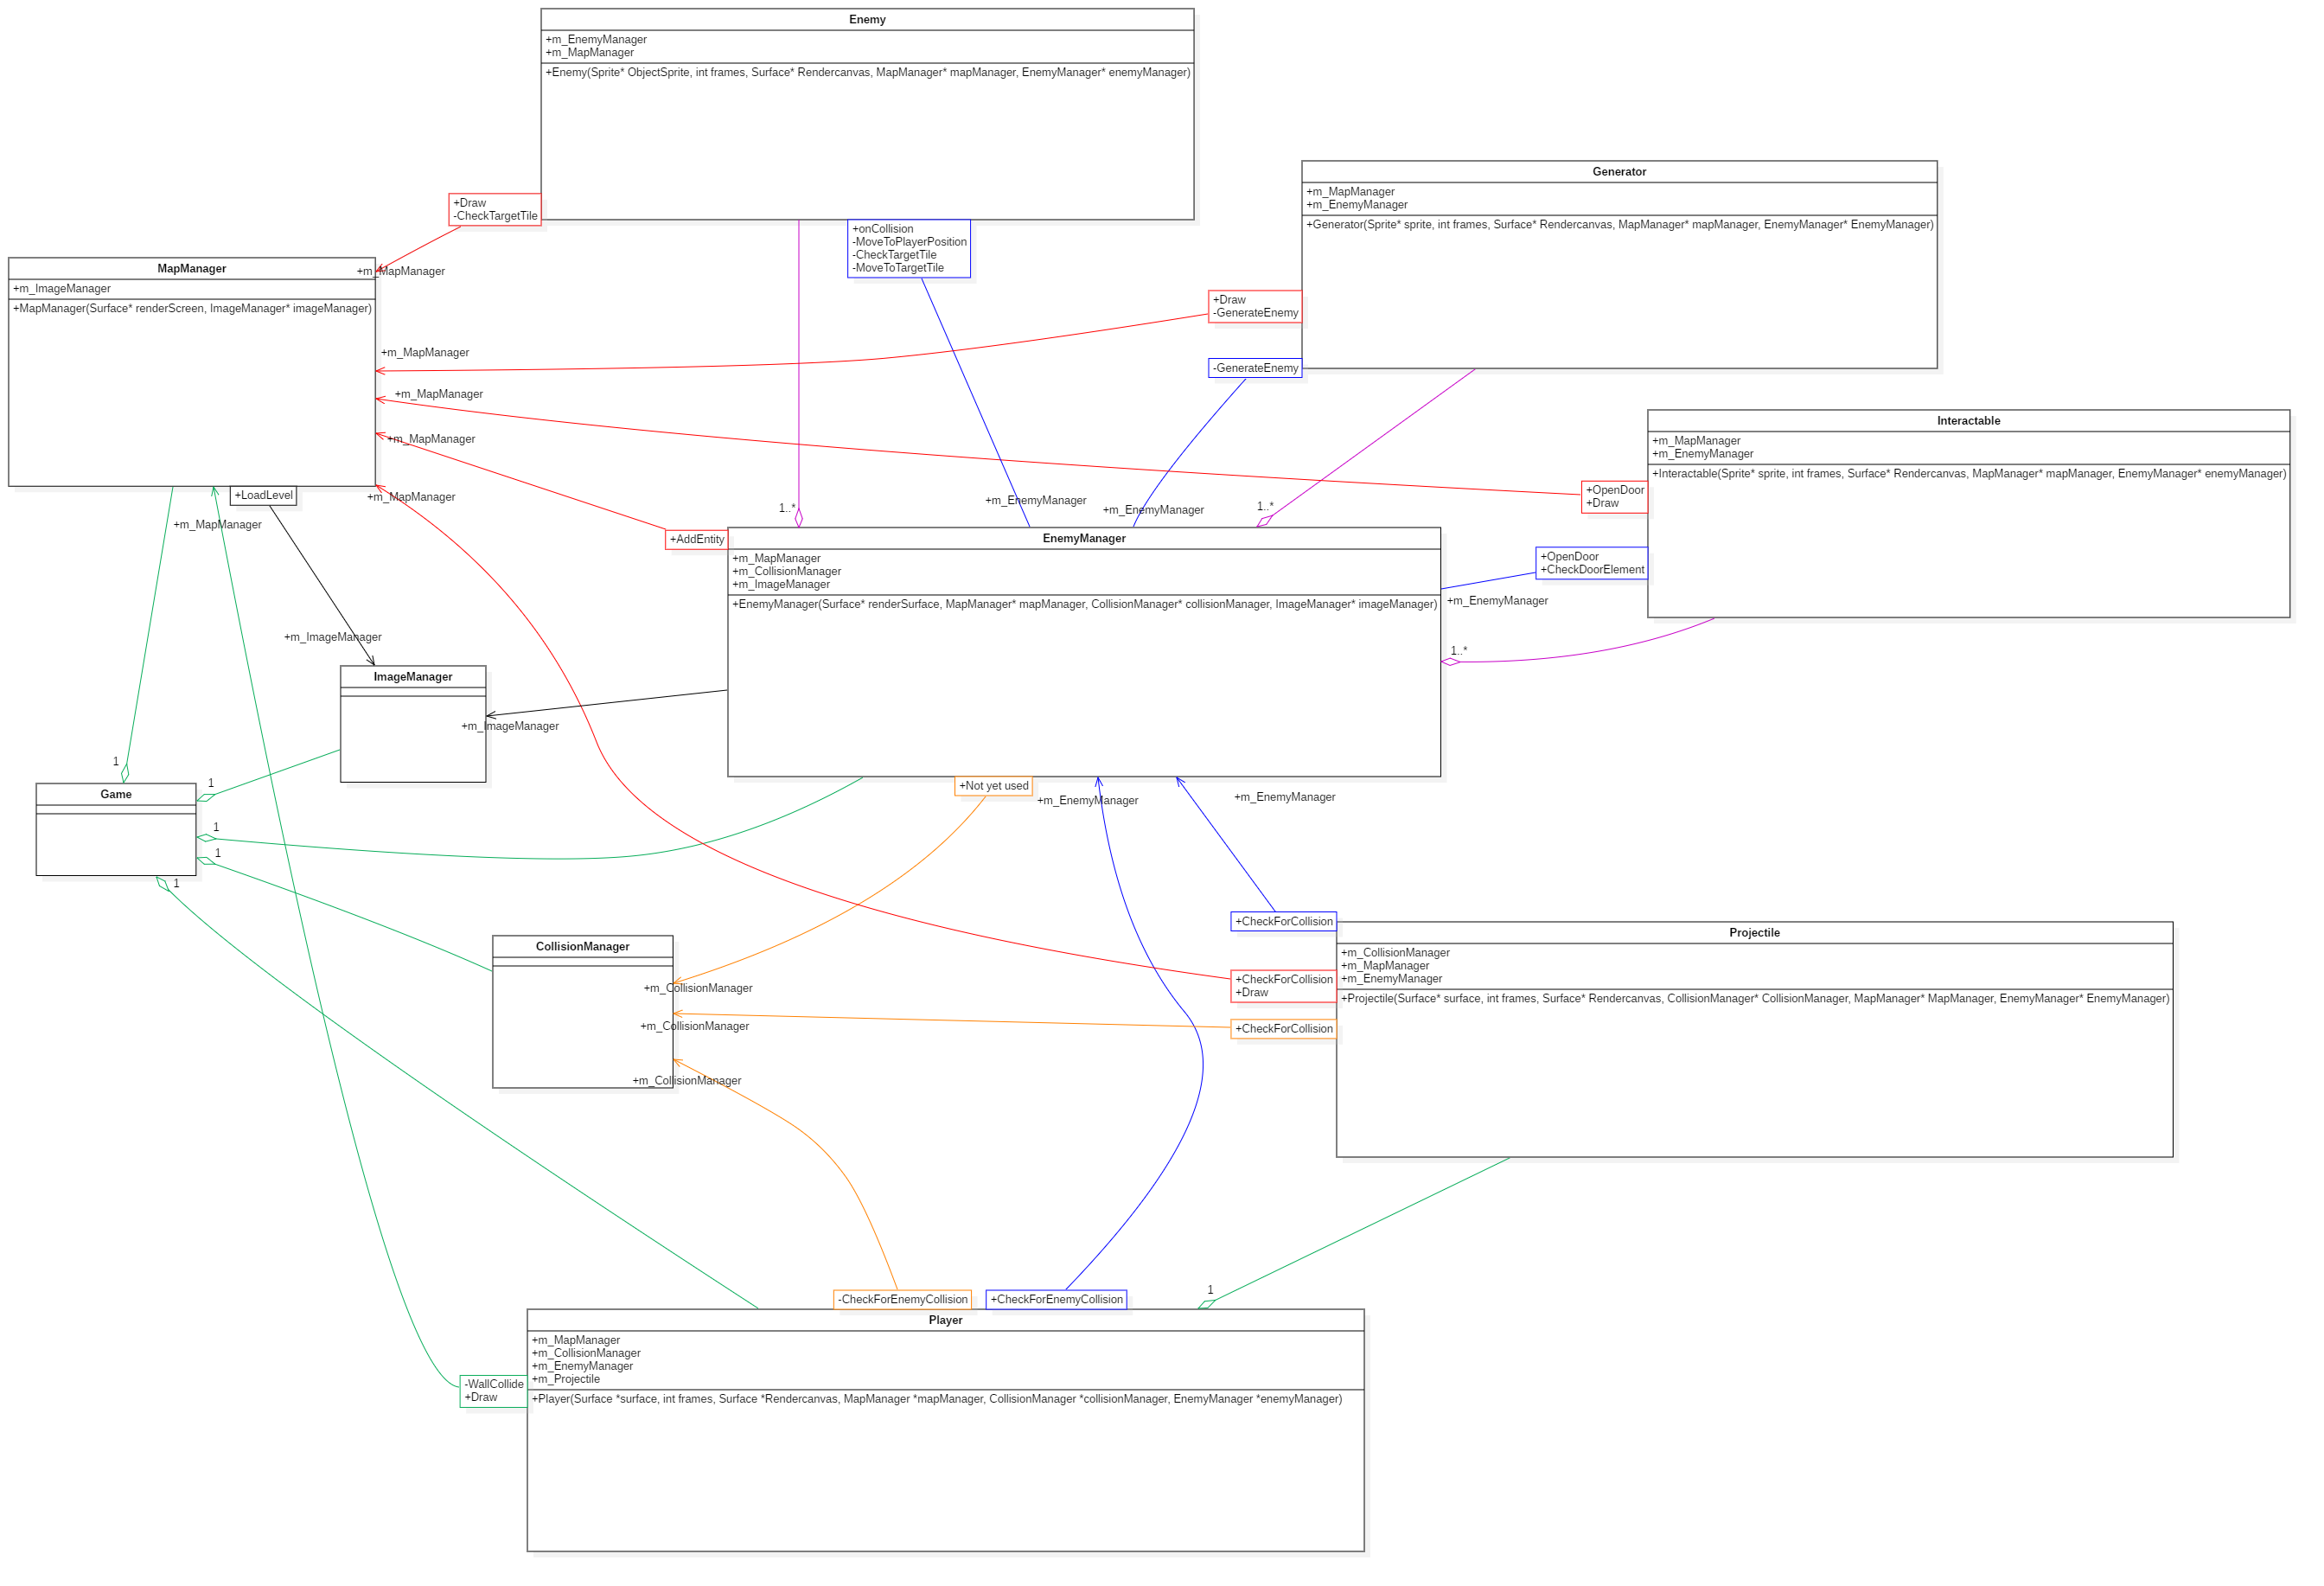
▚ Class Diagram
I created a class diagram to improve my understanding of my own structure and code. Please click the link below to read all the details of this class diagram. Link to the class diagram: link
▚ Individual implemented features
Below a list of fully implemented features inside my personal Gauntlet project:
- Reusing of sprites and image data when creating entities. - Shadow transparent rendering (faked shadows). - Working scaling of sprites/entities. - Projectile objects. - Working AABB and trigger collision, including debug rendering collision boxes. - Working deltatime. - Custom simple animation system. - Player movement. - Working player blocking (walls and level bounds). - Enemy movement (custom Gauntlet pathfinding). - Projectile attacks. - Player attacking. - Interactive doors. - Interactive keys. - Custom level file parsing. - Custom level loading.
- Interactive level grid system, including level tile setup. - Ingame level switching. - Exits to different level with custom sized colliders. - Enemy spawners. - Different enemies. - Enemy levels. - Player and enemy custom statistics. - In game UI elements using game world position. - Static UI elements (Player statistics and scores). - Teleporters. - Upgrades. - Potions. - Food, which adds health. - Implemented 8 levels. - Multiple playable characters (Warrior, Elf, Valkyrie, Wizard). - Interactive player select screen.
The end result is a fully playable Gauntlet game, where I tried to put a lot of focus on the specific features and recreate exactly how they work in the original game. I learned that Gauntlet holds a lot of detail in even the smallest features, which I enjoyed a lot to properly recreate.
Below I try to explain my thought process and go a bit more in depth on how I tackled recreating specific functionality and features:
▚ Main gameplay features
Implementing the main gameplay features, was both fun and a new challenge. Mainly because this was my first time properly working with C++.
While implementing feature by feature, to finish this project, I also learned how depending certain features are on how I structure my game data. Defining and structuring how I handle object placement, data usage and coordinate systems usage in my game environment became more important with every added feature. I definitely learned this the hard way, but also learned how I would be able to do this better the next time I would work on a similar/different project.
Below I mainly talk about specific implement main gameplay features, which helped realizing Gauntlet!
In this section, I mainly talk about several gameplay features.
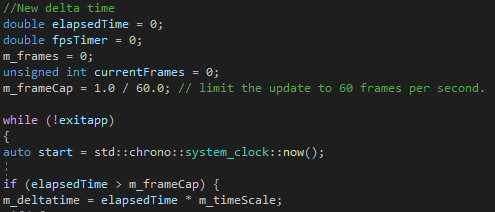
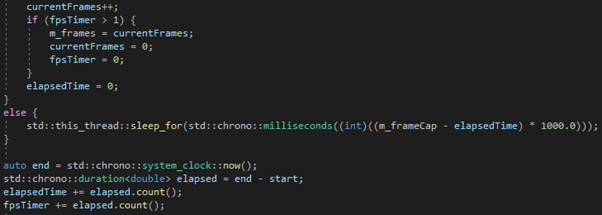
Deltatime: I implemented deltatime, with a calculation to determine the time between different frames. I then use this value to change my player movement, projectile movement and enemy movement. This made sure that every motion is the same on every moment with a possible different frame rate.
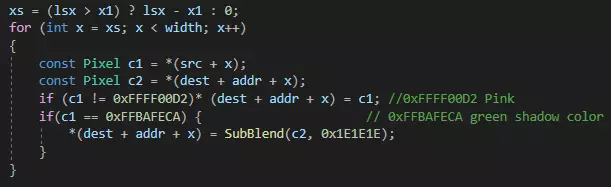
Simple Shadows: After doing research, I learned many retro games handle rendering shadows by replacing a specific "shadow color" and draw a darkened pixel of the background/map. When rendering a shadowed pixel, I combine the original pixel data color of the tiles from the render surface, and a dark grey shadow mask color. Simple Animations System: Inside my project, Animation is working by defining a animation by a start frame and a end frame (number). When an animation is being played, the system moves over these set frames with a needed variable animation speed.
Please read more details and code examples in the specific sections by pressing the subject's tab.
I implemented delta time, with a calculation to determine the time between frames. I used std::chrono to compare the time in-between frames.
I use this value to change my player movement, projectile movement and enemy movement. This makes sure that every motion is handled exactly the same on every different pc with a different frame rate.
After doing research, I learned many retro games handle rendering shadows by replacing a specific "shadow color" and draw a darkened pixel of the background/map. In my Gauntlet project, I chose to use a specific color green that is not being used in any other asset. This color RGB value is R:186, G:254, B: 202). When rendering a shadowed pixel, I combine the original pixel data color of the tiles from the render surface, and a dark grey shadow mask color. I also tested the performance hit, but did not see any major performance issues while rendering shadows.
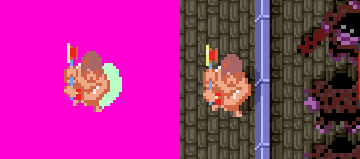
It’s hard to directly visualize, but essentially a lot of gameplay related features needed this system. As seen below, the animation system works for the player in all states:
The animation system supports multiple types of animations that have to be played.
Inside my project, Animation is working by defining a animation by a start frame and a end frame (number). When an animation is being played, the system moves over these set frames with a needed variable animation speed. I added multiple animation states which provide more specific kinds of actions/animation to play. The supported animation states: ● Added single non looping animations functionality. ● Added a OnAnimationEnd function.
Most of the animating code, is written inside the player script. This animation system was focused to work on the player, which requires the most animations for each specific feature.
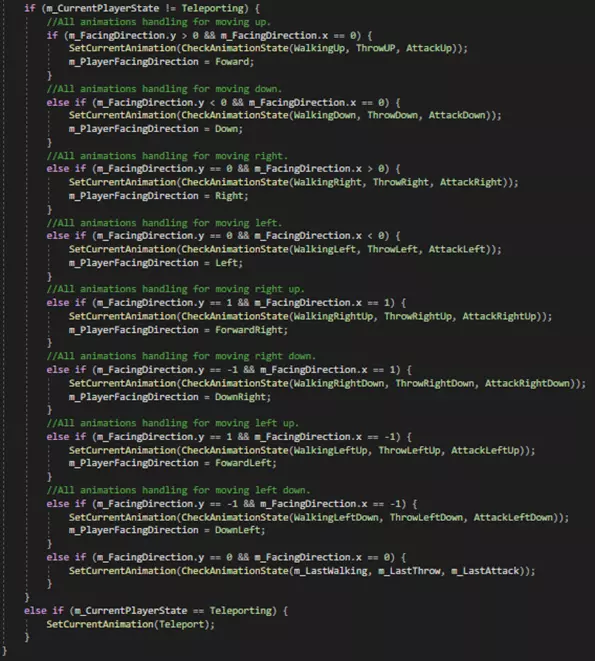
First I have some functions that delivers the right frame data for the player. The 2d array called m_AnimationFrames holds all the animations begin and end frame number (int) for walking, throwing, close combat and teleporting. All the different movement directions (8 directions) have their own animation.
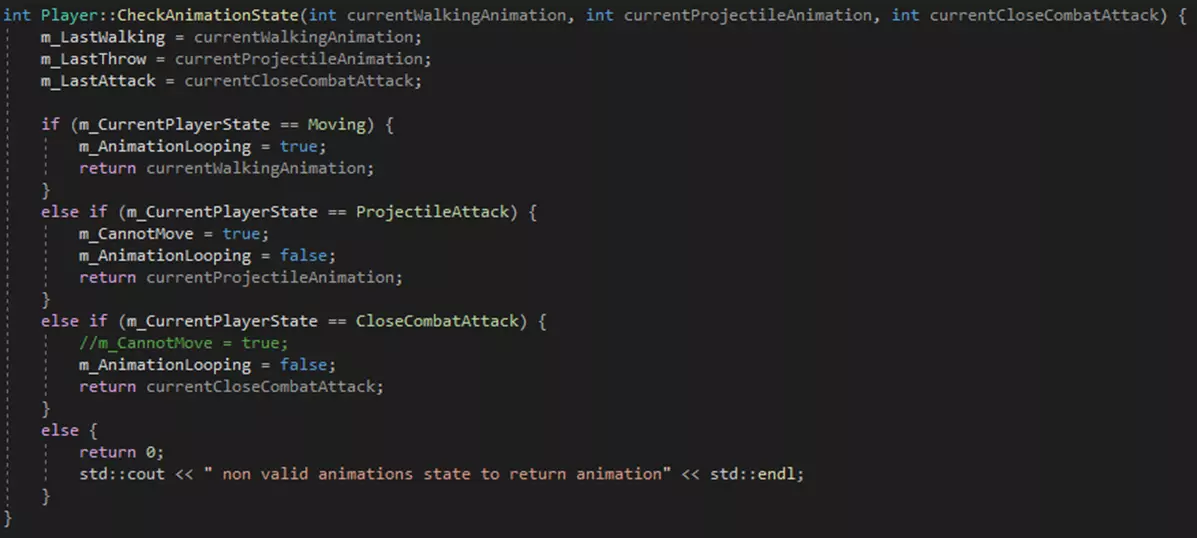
In the CheckAnimationState function, I pass on the animation index for each specific state with the respective direction of the player.
It stores these 3 animation indexes as possible next animation, and checks what the m_CurrentPlayerState is with 3 if else checks.
Then it returns the final index of the next animation. It also sets if the animation is loopable, This is the most recent addition to the animation system. Please keep in mind that this final returned index holds the begin and end frame data for the animation that has to be played.
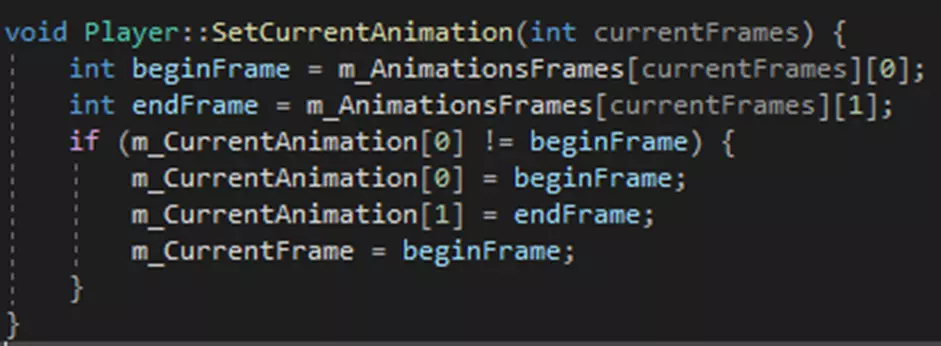
Then with the SetCurrentAnimation function, the begin and end frame variables is set accordingly to the returned index of the m_AnimationsFrames.
If the animation begin and end frame of m_CurrentAnimation are not yet the begin and end frame of the desired animation, the m_CurrentAnimation begin and end frame are set, and the m_CurrentFrame is set to the begin frame. This prevents loopable animations to be reset unnecessarily.
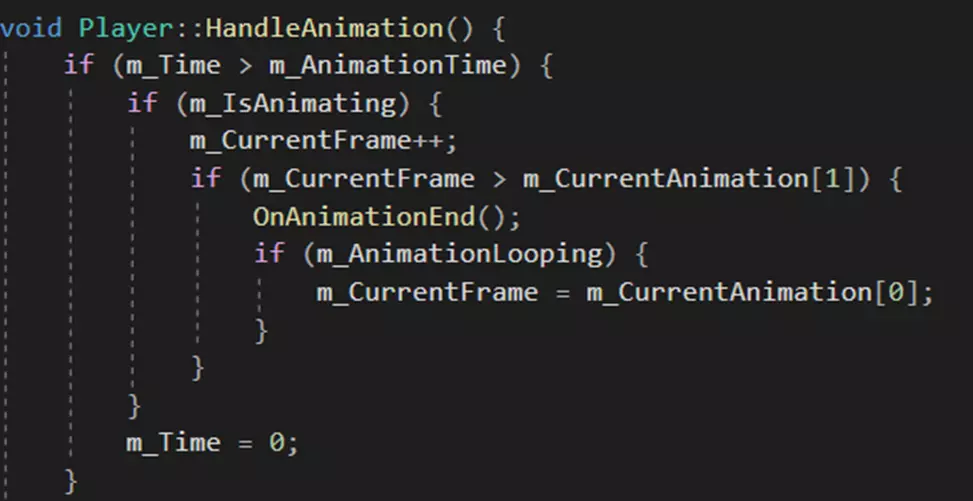
The function HandleAnimation checks the current player facing direction and then uses the functions “SetCurrentAnimation” and “CheckAnimationState” to set the right framedata to be played.
Here It passes all the right possible indexes and makes sure the right animation is set. HandleAnimation is also responsible for actually changing m_CurrentFrame. It checks if m_Time is higher then m_AnimationTime, and if so the next frame should be set.
m_CurrentFrame++ can used, if the animation goes out of bounds (m_CurrentAnimation[1]) , it’s resetted to the begin frame of the current animation (m_CurrentAnimation[0]). On animationEnd is called whenever this happens, which means that logic can be done when a animations ends.
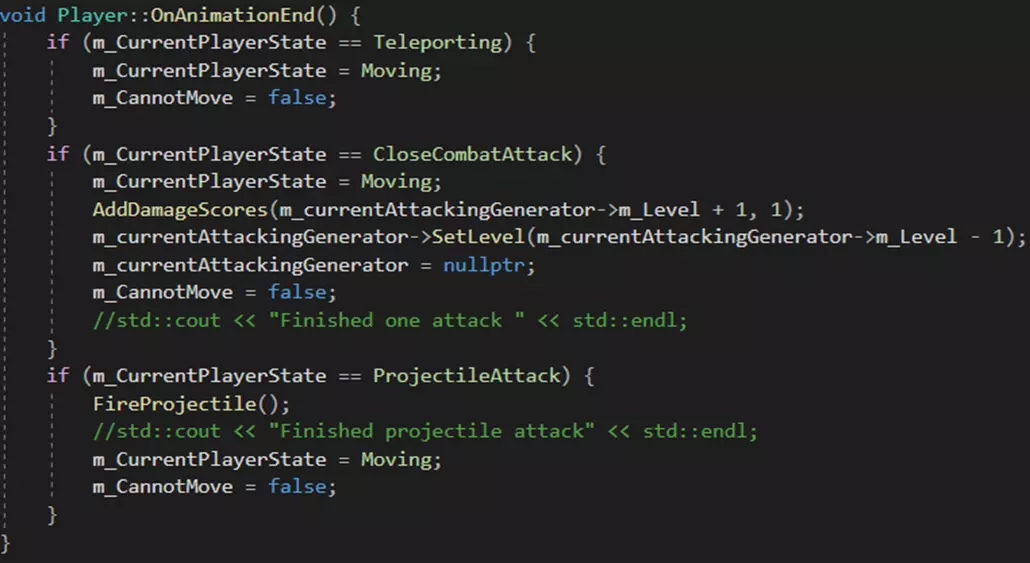
In the OnAnimationEnd function, accordingly to the current player state, gameplay code is executed.
▚ Level and data loading
Setting up my levels and being able to load interactable was one, if not the most important features I worked on. Defining how the data is stored and adjusted when necessary had a big impact on the features I worked on later.
From being able to generate a tile map, following custom written level data, to adjusting in game interactable data. I made sure to make it as dynamic as possible to be able to create as much gameplay features as possible without limiting myself due to how I handle storing level and interactable data.
In this section, I mainly write more about how I load data, Parse and store the data, use the data and change the data when needed.
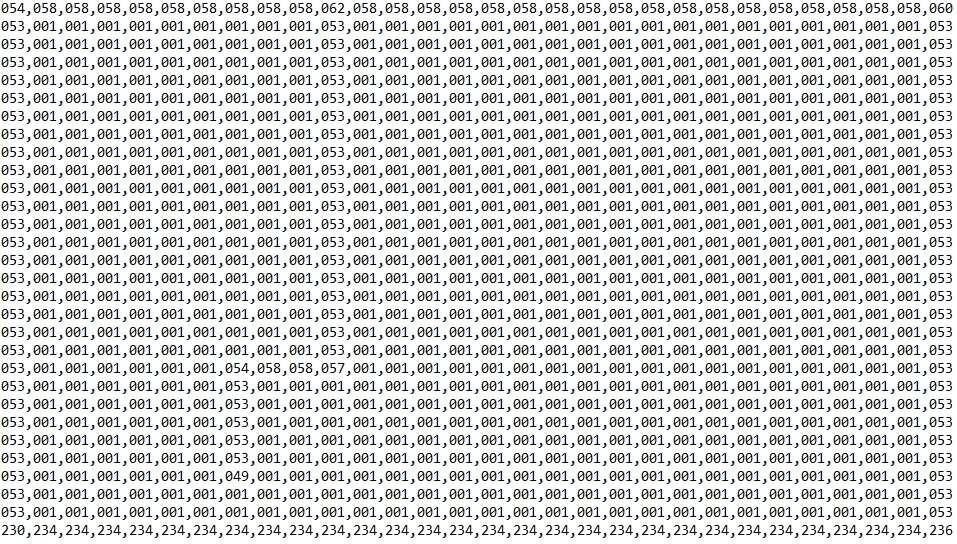
Level Loading and Map Switching: In gauntlet, one of the most important features is lever switching. To recreate this, I had to finish multiple aspects of this feature. I first started with setting up how I want to setup my level files. I decided to store each individual level tile/block with a specific index. Using this system, the file can be parsed and individual levels can be loaded using a custom function shown below.
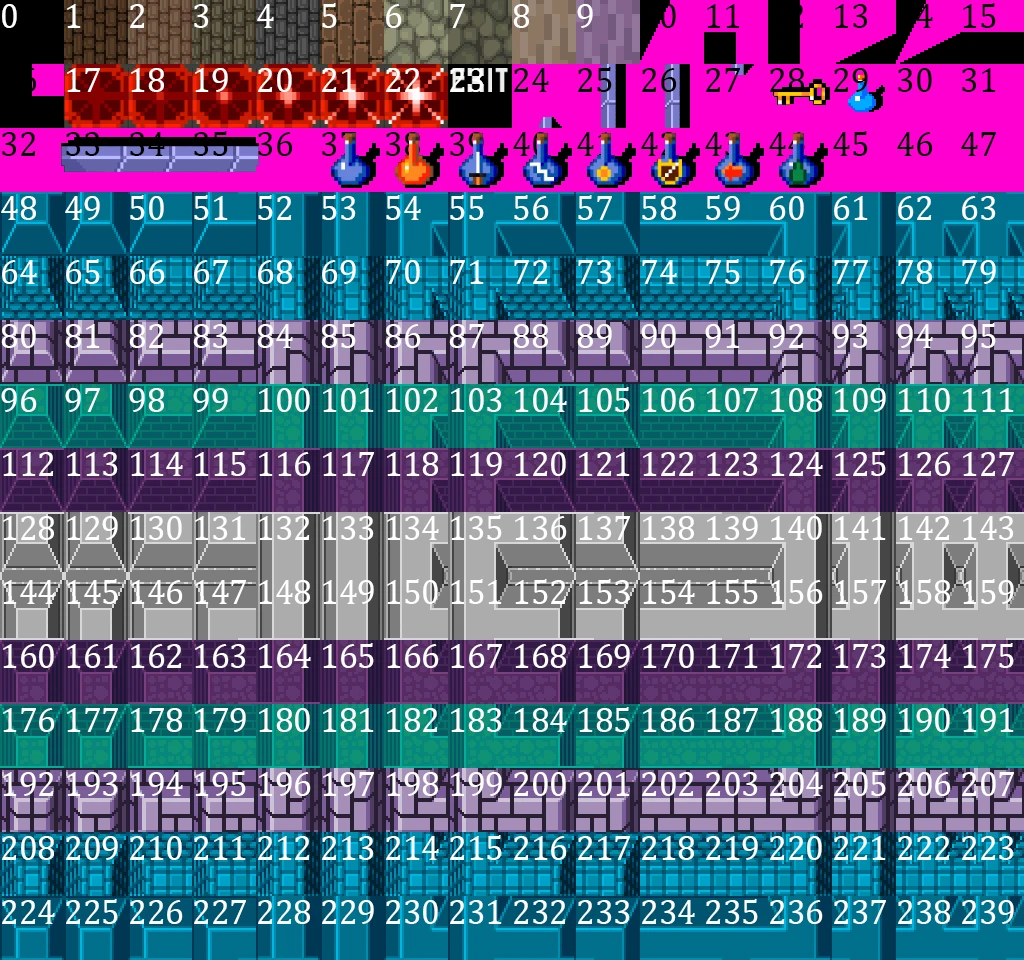
Example of a level file (level 1).
numbered tile sheet I created
Interactable Loading: Spawning enemies and other interactables is done in a similar way to spawning the level tiles. In the switch level function, I also call the PlaceLevelEntities function through the EnemyManager. These functions first add the right data to a interactable data array, and then call specific functions to create and place those interactive objects. Good examples are doors, enemies, generators or pickups.
In gauntlet, one of the most important features is lever switching. To recreate this, I had to finish multiple aspects of this feature. I first started with setting up how I want to setup my level files. I decided to store each individual level tile/block with a specific index. Using this system, the file can be parsed and individual levels can be loaded using a custom function shown below. (later during this project, I learned more about Json, but decided to use that in the next project).
Example of a level file (level 1).
numbered tile sheet I created
when loading and switching I first reset the level tile data. This data is used to know if a tile is solid or walkable. I also make sure to clear all the existing created objects (e.g. doors, interactables and enemies).To both load in and switch levels, I created the following functions:
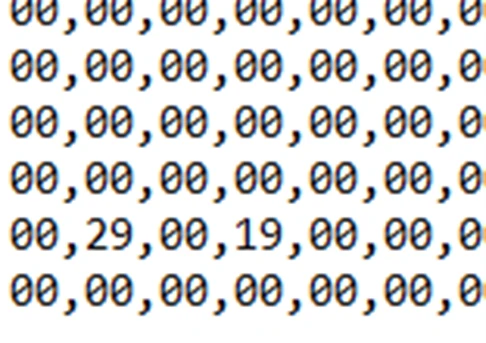
In the switch level function, I use a switch case to determine which level (which is given as a parameter) should be loaded. Here the level specific text files are loaded towards the load level function and to the enemy manager which places the right objects in the level (e.g. Generators, monsters, potions, etc). The player start position is set as well, which is also level specific. The load level function, uses Strtok (string to token), which is able to read a text file and divide different string characters to tokens. The string gets split up by a , character.
Spawning enemies and other interactables is done in a similar way to spawning the level tiles. In the switch level function, I also call the PlaceLevelEntities function through the EnemyManager. This function is really similar to the Mapmanager’s LoadLevelFunction, however in the PlaceLevelEntities function I am reading and using different data. Data that is containing the level specific interactable and entity variables.First of all, after reading the different tokens, using Strtok (string to token), the data is forwarded towards the AddEntity function. Then in the AddEntity function, I use a switch case to determine which Entity should be spawned.
I keep the entity int stored in a enum, which hold all the values of all the entities. Readable list of all the entities. This is mostly used to keep track of the different types of entities.
A lot of detail goes into spawning each entity, and it could definitely be smaller, certain function are being repeated. However, There is also a lot of specific gameplay variables that needs to be properly set.
For most of the objects, I set if they are a trigger (collision wise), are static (collision wise), setting the level, setting the world position, setting the alpha offset, setting the entity type, setting the sprite data, setting door data (if door), setting neighbour data (if door), setting the health and score values and setting the original tile data.
All entities that can be created stored in a enum called "EntityType".
The treasure chest instantiated with all the needed game variables being set.The Ghost instantiated with all the needed game variables being set.
Spawning interactables with level specific data. The main flaw of my text based level system, was indicating extra data. While all my entities were spawning flawlessly, I encountered this issue when I started working on the level exits (This exit has to have data to what level the player should go to).
I thought of a way to fix this, I wanted to add an extra value on the original text file data, which is separated by a “:” character.After implementing the extra value in my enemy manager PlaceLevelEntities function, I was able to add predetermined data to all the objects. Exits were now able to correctly move to the next level, and objects that could spawn with a specific difficulty such as generators also worked. I don’t check for the “:” character, I check if the token size is bigger than 3, and then subtract everything before the 4th value.
Again, this would have been no issue if I would have worked with Json and a third party Json parser, but this was a fun way of learning and finding creative solutions.
▚ Interactables
I created a Interactable base class so that every created interactable, even derived sub classes can be easily updated, triggered and collision checked through virtual functions. The interactables are placed/created in a similar way as how enemies and generators are placed/created through the EnemyManager and a text file token/value. The most interesting part in the scripts are the OnCollision and the OnTrigger overridden functions, here is where all the specific object behavior is written.
More in depth info about each implemented interactable is shown below!
When the collision or trigger check is called, I mainly use dynamic casts, to check if a interactable is colliding/triggering with a specific object to then do some specific behavior (e.g. to do different behavior for picking up or hitting an interactable with a projectile).
Fully implemented interactables: - Doors - (opening itself and opening surrounding doors). - Exits - (teleporting the player to another/the next level). - Food - (Add health on pickup). - Upgrades - (Improves the stats of the player). - Keys - (Adds key to inventory). - Potions - (When picked up: added to the inventory. when shot: directly used in the level with reduced effect). - Teleporters - (teleporting to the nearest teleporter, or depending on the light amount). - Treasures - (Adds score on pickup).
Doors overview:
When I finished object based player interaction with interactables, and being able to block the player with trigger colliders, I started working on realizing the doors. I tried to implement as many different door types as possible, where I had to resolve different kinds of problems I encountered.
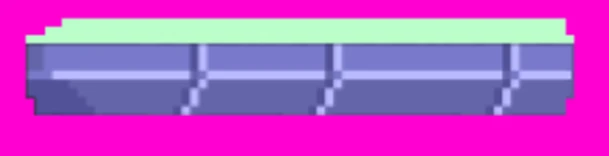
I created different door assets, which I use to procedurally generate fully working doors. The individual tiles, representing a specific door piece, are all important to support all kinds of doors.
As you can see, the shadow color is also included in the shown assets. These assets are divided in separate tiles (64x64), but are all placed together in the tile sheet.
Horizontal door tiles. including begin and end door asset.
Vertical door tiles. including begin and end door asset.
Connected squared door asset.
non connected double door on same tile asset.
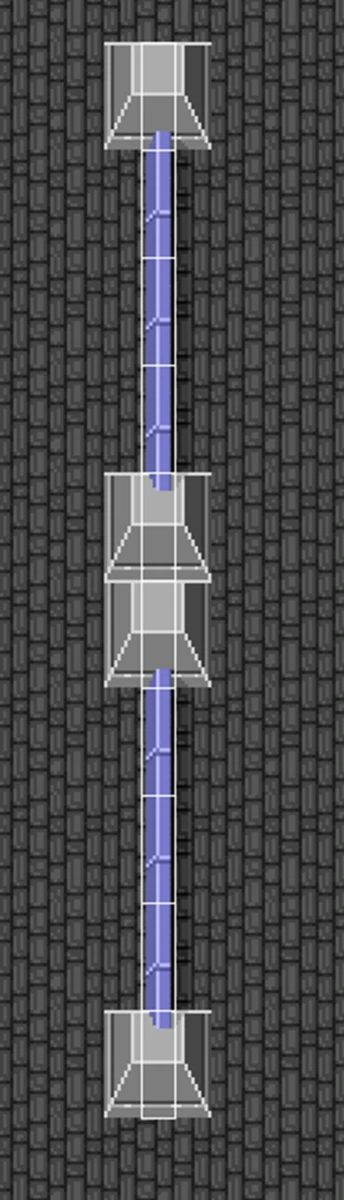
Double door data problem:
The problem shortly described: As explained in the interactable and level loading sections, I can only load 1 tile interactable on each specific tile.
before, it was not possible to have 2 door endings on the same tile, which I have seen working in the original game.
The data of one tile would overwrite the other tile. Even if I ignore that problem, the door would be seen as one big door due to the neighboring connected doors being set without empty space. The empty space is used to recognize an ending of a door.
The double door asset would always be connected to both doors.
The solution (memory wise):
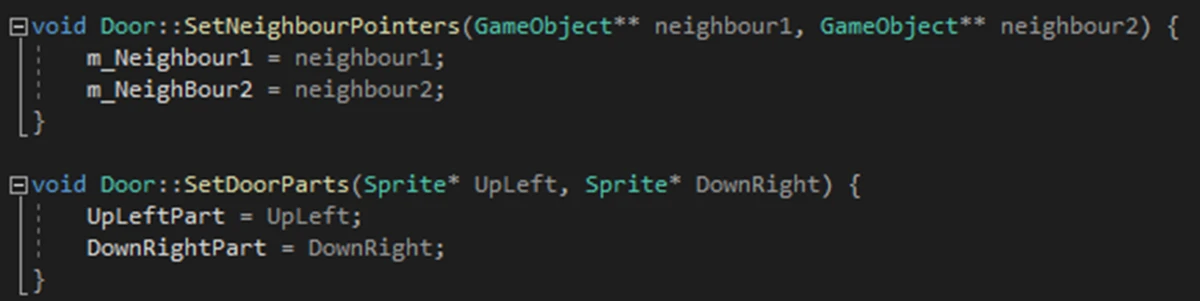
I decided to improve my knowledge about pointers and solve this problem at the same time. I firstly created all the “double” door sprites, in which connections to two different doors are placed on sprite/tile.
The direction of the neighboring doors are always known when placing a double door tiled door element, this is due to the fact that you place a door that connects specifically to a certain defined door neighbor.
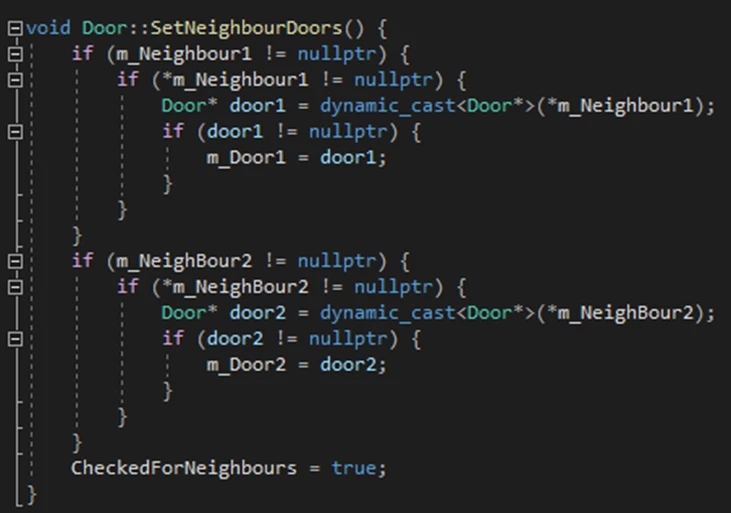
However, you can’t directly set those 2 neighboring door references while creating the door, because the neighboring door object could potentially not yet have been created in the place entity for loop.
My solution was, setting pointers to a pointer references from the interactable 2d array, where the doors are supposed to be when the whole place entity for loop is finished. A pointer to a pointer. With this working, after the for loop is finished, and all the doors are supposed to be placed, I do a dynamic cast in the double door object, to make sure those objects (when dereferenced) from the double pointer (**) are actual door objects. A reference is set and the double door has a correct reference to the neighboring tiles and doors.
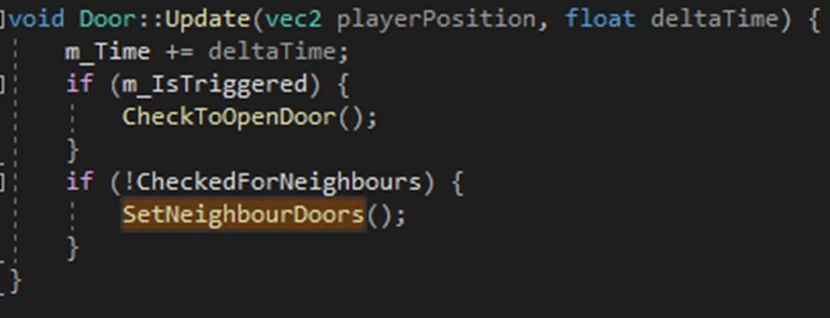
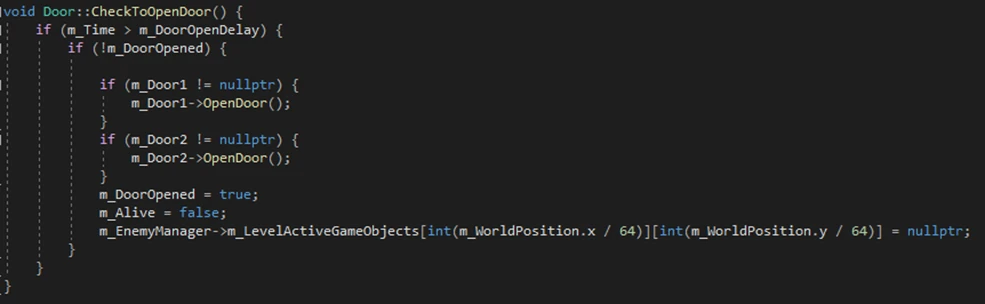
Interacting with the doors.
Whenever the player interacts with a door/when onCollision on a door is triggered, 2 functions are called if the player has at least 1 key in the player inventory. It first calls all the neighbor doors to set the m_DoorKeyTaken boolean to true. This will ensure that all the doors that are supposed to open with delay, don’t take anymore keys.
The second function that is being called will open up the touched door, wait a certain amount of delay time, and then call this same process for the neighboring door. This will open all the neighboring doors. When getting to the double door tile/element, I had to add a boolean, called m_IsTwoWayDoubleDoor, which prevents triggering the wrong (connected on the same tile) different door.
Now for setting the correct sprite on the double door tiles, after opening 1 of the 2 doors. I decided to solve this issue with checking both of the neighbors on the m_DoorKeyTaken boolean.
If for example, the “first neighboring door’s” m_DoorKeyTaken boolean is true, it should change sprite to connect to the second neighbor door and the other way around when the first neighbor door’s m_DoorKeyTaken would return false.
Whenever this process is called by opening a neighbor door, the m_IsTwoWayDoubleDoor is set to false, and this door will be destroyed when the remaining connected doors are triggered.
Final results:
As shown below, I am able to properly interact with different types doors, where specific more complicated shaped doors are working without opening the different (but connected) doors.
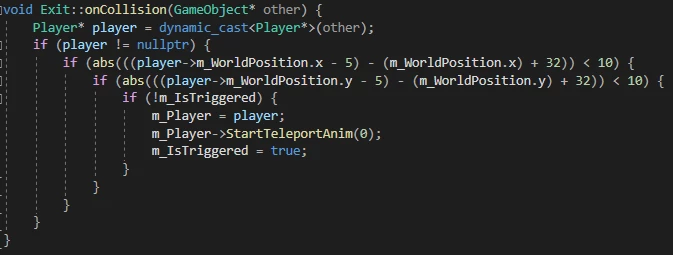
The exit is responsible for teleporting the player towards specific levels, or level specific next levels. With the Oncollision function, I first check if the player is colliding with the exit. I use a simple ABS and specified range to detect if the player is touching the center of the exit, instead of the border of the exit. If the player is inside this specified middle section of the teleporter, it sets the teleporter m_IsTriggered to true. It also calls the StartTeleportAnim to the player. In the update, after a specified timer, which indicates if a specific player teleport frame has been played, it sets the ReallyTeleported boolean to true. When this happens (only once), this also calls the TeleportPlayer function. The TeleportPlayer function, call the SwitchLevel function, in the MapManager. This function is also used to load levels.
Because the Exit is a interactable with a specified m_ObjectValue, specific levels can be loaded when triggering specific exits, which receive the next level value, using the interactable loading.
The final result:
Research:
The teleporters were way more detailed and complex then expected. I made sure to implement as much detail as possible.
I have done a lot of research and found a lot of details on the teleporter. To which teleporter you get teleported is normally decided by range to other teleporters. Normally the nearest teleporter (on screen) would be the target, However if there are multiple teleporters that are equally distanced, it’s decided by the amount of “light” comes out of the teleporter. (indicated by animations frames). For example, If you step into the teleporter while there is light under value 3, you get teleported towards the first nearest teleporter. And with a light value of above 3, you get teleported to the second nearest teleporter.
The second most important feature I really wanted to implement was the requested teleportation neighboring tile place. Whenever the player would teleport in gauntlet, You would be able to determine your final destination neighboring tile by holding your input in the desired direction (if this was a valid destination). If there is no key pressed, or the desired destination is not valid, the destination tile is randomly decided.
Finding the target teleporter:
The whole teleporter process begins with the OnCollision function. The nearest teleporter always has to be calculated mid game, due to the fact that screen position is important. Only teleporters that are in on screen will be available to teleport to. In the Oncollision function of the teleporter, it is checked if it was indeed the player that interacted with the teleporter, if so, it checks if the teleporter is already “Triggered”, If not, it calls the the FindNearestTeleporter function. In the FindNearestTeleporter function, I determine all the closest teleporters to the triggered teleporter. Through the enemy manager, I check all the teleporters in the level. I check if they are within the screen by checking distance from the screen world position. I then determine the X and Y distance from the found teleporters and save those values to differenceX and DifferenceY. I check if these values combined are smaller then the currently closest value, If the so, I clear the vector using the ResetFoundTeleporters function. If the distance is the same as the currently closest value, I add this teleporter to the m_NearestTeleporters vector. By doing this, it is possible to have multiple teleporters saved as nearest teleporter. Depending on the final size of the vector, the nearestTeleporter reference is set. Which is the final target teleporter, which the player teleports to. (With a size of 2, the final nearest teleporter will be decided by the current frame of the teleporter). At the end of the FindNearestTeleporter, m_Activated is set to true.
Registering preferred player direction:
I encountered a problem while trying to use the current input while teleporting after deciding the nearest teleporter. If the player moves into the teleporter, certain input is probably used to move towards that teleporter. I learned that the I needed to give the player the ability to press different keys to decide a desired target tile. However, The Oncollision reaction (teleporting) happens right after hitting the collider. There would be no time to register different keys being pressed.
To register new input after the player has collided with the teleporter, I use the update to first capture new input, and then teleport the player.
If the teleporter is set to m_Activated (which means the whole process of finding the nearest is done), I delay the input check by waiting 10 frames. After the 10 frames are done, The player has had enough time to press a new key.In the if else statements input is checked, and the m_DesiredTeleportAxis is set on both the X and Y axis. The TeleportPlayer function is called, which passes on the player and the reference to the nearest teleporter. m_Activated is set to false to not do this whole input checking again.
Teleporting the player:
In the TeleportPlayer function, 2 important things happen. First it checks the input decided m_DesiredTeleportAxis tiles for enemies and non moveable tiles. If the desired tile is empty, the player gets teleported to that tile. If the desired tile is not empty, a while loop starts that tries a random spawn position index until it finds a empty possible spawn tile.m_Activated is set to true, so that the whole loop does not start over. The player is teleported, the camera is set to lerp on a target position and m_IsTriggered is set to false, so that the teleporter can be used again.
Final results:
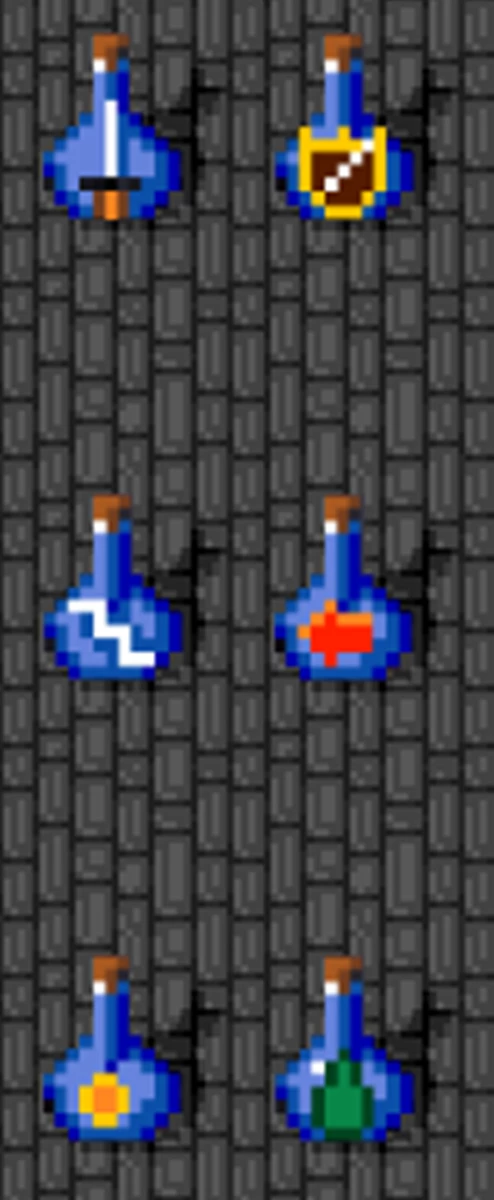
I really liked the potions in gauntlet, and tried to recreate them in my project. Potions are pretty similar to keys, they are added to the player inventory.
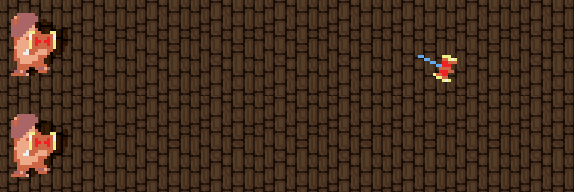
Blue potion in game
Red potion in game
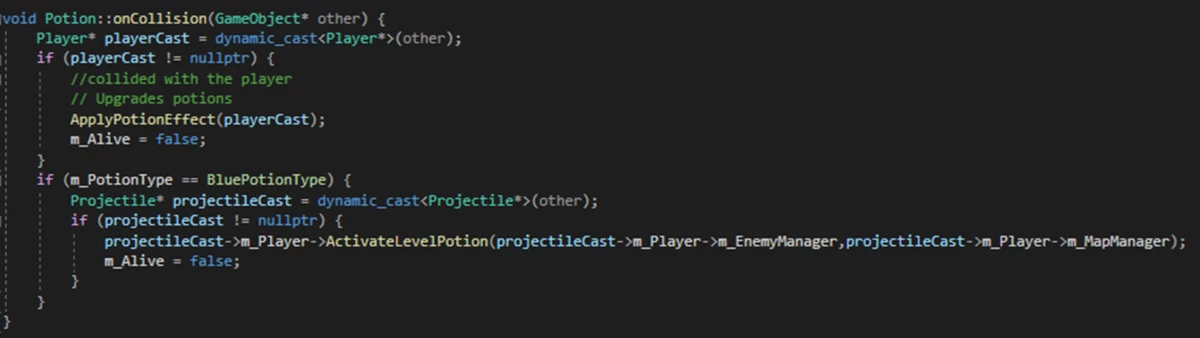
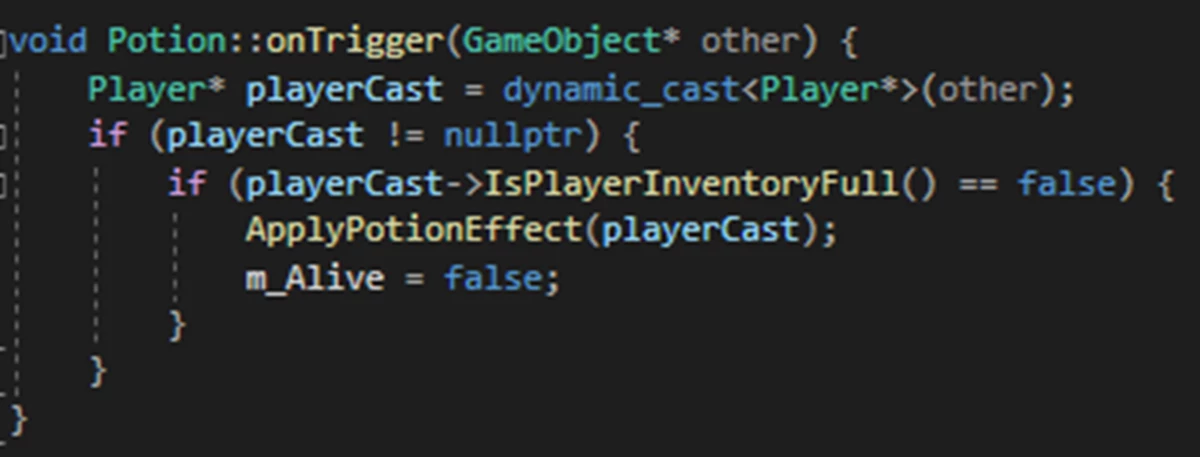
The potions work in a modular way. When created inside the EnemyManager, a potion type is set. Red and blue potions are set as triggers (because they need to stop the player if the player inventory is full) in comparison to upgrades that use onCollision because they can always be picked up.
In both cases (onTrigger and onCollision), ApplyPotionEffect is called. In onCollision, it is first checked using a dynamic cast if the player touches the potion, if so, the potion is applied using the ApplyPotionEffect function.
If the interactable is a blue potion, it is also checked through a second dynamic object cast, if a projectile collided with the potion interactable, is so, the ActivateLevelPotion function is called, which applies damage to the onscreen enemies and enemy spawners. In the onTrigger, It is checked if the player inventory is full, if not, the player picks up the potion, which calls the ApplyPotionEffect. In both the onCollision and the onTrigger, if interacted, the variable, m_Alive is set to false, which removes it from the game in the next frame.
The potion type is forwarded to the player, when adding a potion to the inventory. this was needed to properly display and use the collected red or blue potion.
Final results:
As shown below, I am able to properly interact with both the potions.
All different upgrades:
For the Upgrades, I use the same code I wrote for the potions, where I am able to forward a triggered upgrade or potion type, which is used by the player when calling the right functionality.
There are different implemented upgrade types, listed from up left to right:
* Melee strength upgrade -> Increases player melee variable. (Melee strength is used when calculating damage done to enemies).
* Armor strength upgrade -> Increases player armor strength. (Armor strength is used when calculating damage done to the player).
* Shot speed upgrade -> Increases projectile/shot movement speed. (Specific character based upgrade speeds are applied to the projectile after picking up this project).
* Player movement speed upgrade -> Increases player movement speed. (Increases the player movement speed to a character specific upgraded value).
* Shot power upgrade -> Increases projectile damage amount. (Increases the character specific projectile damage amount).
* Magic power upgrade -> Increases potion damage amount. (When picked up, potion do more damage).
All upgrades in the level
Visual examples:
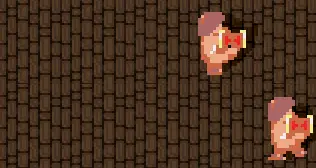
Besides the variables that directly change from picking up specific upgrades, the player movement speed upgrade and the Shot speed upgrade are directly visible in the game.
Player movement speed upgrade applied on the lower character*
Shot speed upgrade applied on the lower character*
More about the logic behind the upgrades is mostly written in the player stats and UI sections (below in this page). The logic mainly does 2 things, It first enables the icons in the UI manager using the passed on Upgrade Type to enable a specific icon. It then uses a switch case to set a specific player stat to the upgraded player stat.
Using the same Interactable class, I use the OnCollision function to add health to the player when food is being picked up. Health is constantly decreasing, by time or when the player has taken damage. Food increases the player health by 100, but some food interactables can be broken by projectiles from both the player and enemies.
Breakable bottle
Non breakable food
▚ Player data, Level data and UI
After the core features were working, making sure every feature would get together, required storing and handling player data, level data and displaying some of these values to the UI.
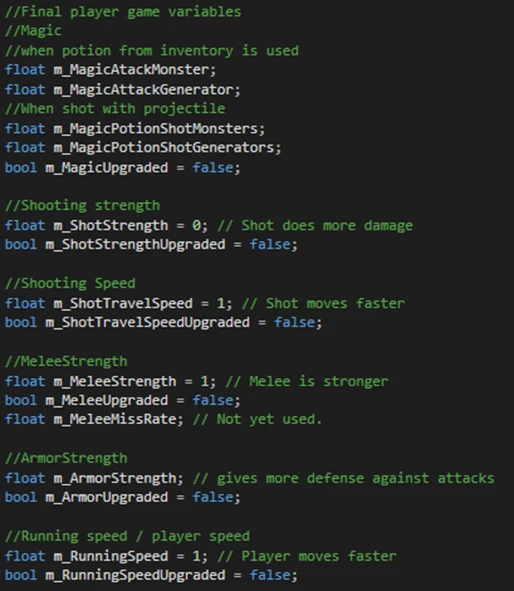
The player data is used in many different features. I made sure to have a clear place where I can get the data, and update the data when needed. Especially when picking up (and losing) upgrades, is where this data is updated.
Displaying variables in game, was a huge learning curve, but a must have in my final project. I learned how to implement custom fonts and draw texts on the screen. This was then properly used to display the needed variables on the screen.
In this section, I mainly write more about how I handle implementing specific player data to better follow the original game. Adding the functionality behind implementing custom fonts, drawing texts was a challenge but fully implemented and written in detail about, in the sub tabs.
I mainly handle placement and specific functionality of UI elements in the UI manager, here the creation, existence and deletion of the UI elements is handled properly.
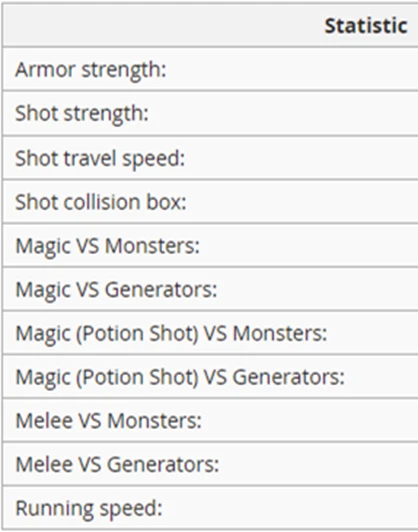
Player stats: I used the Gauntlet wiki that provided an amazing amount of information and game statistics. Link to Wiki. I directly used this information to know which variables to create, which functionality to support and when to change specific variables.
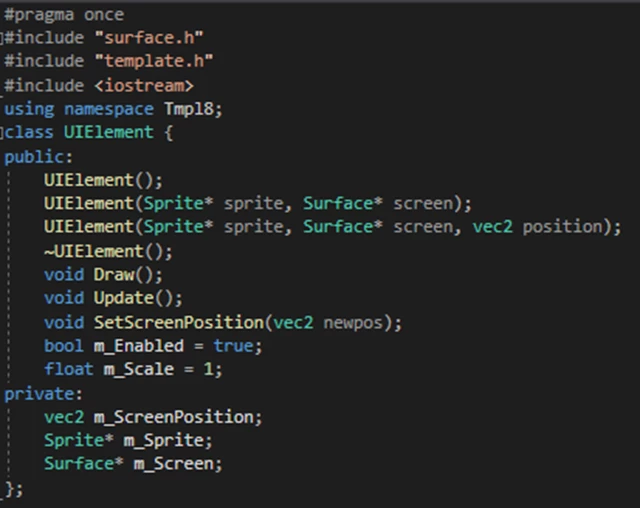
UI element and UI manager: I created the UiElement class. Which has similar functionality in comparison to the GameObject class, but doesn’t need most of the gameplay related functionality that is written in the GameObject class.
I needed a way to add images, icons and texts as UI elements. Instead of putting this in the enemy manager, I decided to create a new class that would be responsible for creating, updating and adding such UI elements. I called this new manager, the UIManager. Custom Fonts and Text class: Ui text was a big roadblock. I got feedback from other students, that one option would be, defining characters using separated sections of an image containing all the main characters. However, I did some research on different text rendering approaches in SDL 2.0. And decided sdl_ttf was a really useful library to draw text.
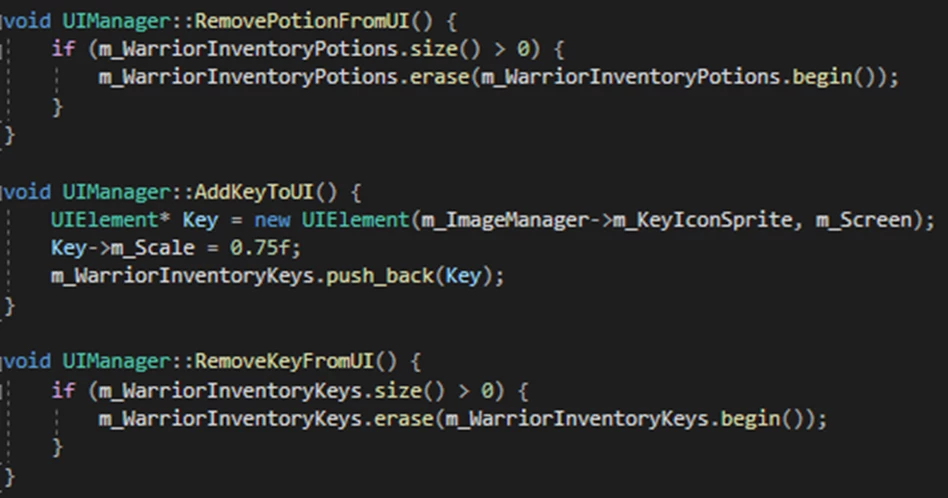
Enabling UI Icons: A small tab, where I mainly talk about how I implemented enabling and disabling specific icons and texts. I added the option to easily add and remove keys and potions from the inventory of the player.
Player Select UI I implemented a (self designed) player select screen, which displays important player stats (accurate to the original) for the active selected character. This is mostly done using the features described in the previous tabs, but I did implement on click (interactive) UI elements, which were used for buttons. Please read more details and code examples in the specific sections by pressing the subject's tab.
I used a Gauntlet wiki that provided an amazing amount of information and game statistics. Link to Wiki.
In the beginning of the project, before learning about this wiki, I used to try and see what happens to the stats in the real game. I noticed some values, and wrote them down. However when I found out, that the wiki had informaiton regarding all the player statistics, enemy statistics, gameplay details and behaviour and way more, I decided to use the wiki as a main source of information.
The player data was especially really useful. All the variables I implemented are listed below in the image.
Blue potion in game
Red potion in game
All the variables have base and upgraded values.
All these variables are used in, player damage calculations (Melee strength), enemy damage calculation (Armor strength), Shot strength calculation (damage on enemy), magic vs monster calculation (potion attack on monster damage), Magic vs Generator calculation (magic attack vs generator damage).
The UI element:
I first created the UiElement class. Which has similar functions in comparison to the GameObject class, but doesn’t need most of the gameplay related functionality that is written in the GameObject class.
The UI Manager:
I needed a way to add images, icons and texts as UI elements. Instead of putting this in the enemy manager, I decided to create a new class that would be responsible for creating, updating and adding such UI elements. I called this new manager, the UIManager. I use a vector called m_AllUIElements to store all the created UIElements to be able to loop over them and update and render all UI elements in one loop.
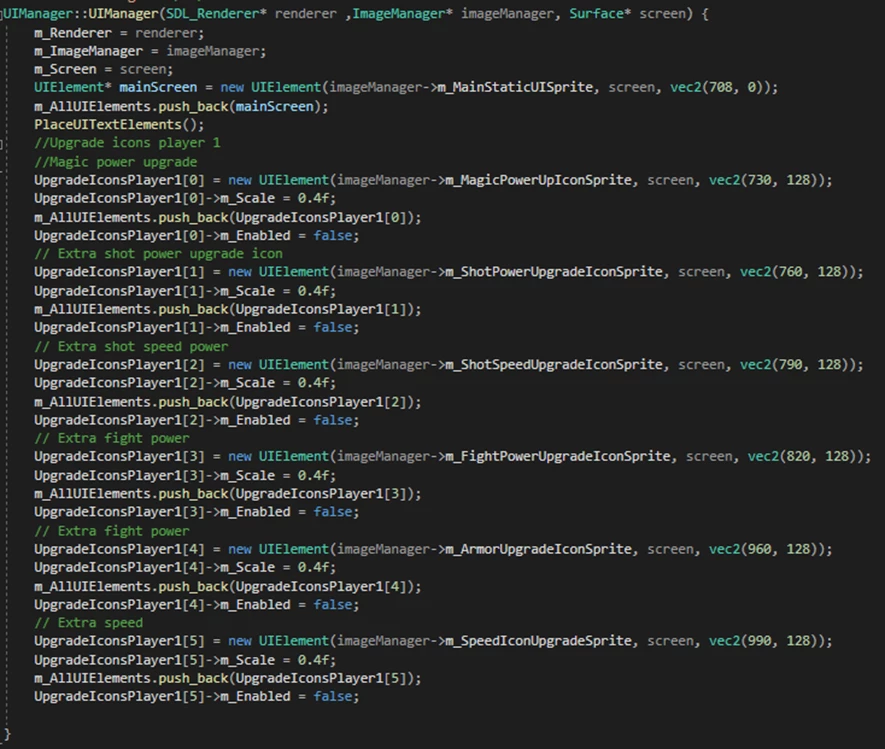
In the constructor of the UIManager, all the important non mid game generated elements are created and placed correctly on the screen.
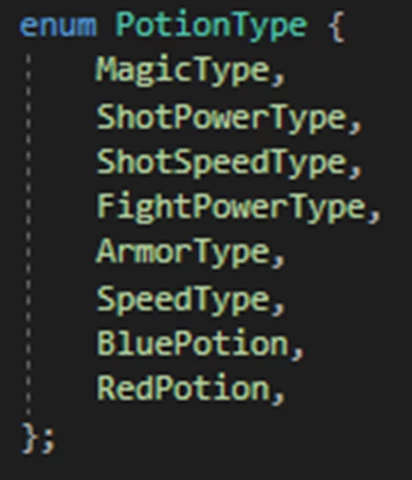
All the upgrade icons are added to an array, in the right order to be equal to a created upgrade and potion enum. Currently, this array represent the icons for player 1, but more arrays could be added when playing with multiple characters is implemented.
SDL_ttf and loading fonts:
Ui text was a big roadblock. I got feedback from other students, that one option would be, defining characters using separated sections of an image containing all the main characters. However, I did some research on different text rendering approaches in SDL 2.0. And decided sdl_ttf was a really useful library to draw text.
SDL_ttf is set up in a lot of different approaches, But I liked to have a class that does everything that i needed at one place. The only thing that is handled outside the UIText class is the font. The fonts are stored in the Image Manager class.
The font is used by all the created UITexts. It would be a waste of performance and memory to always create and prepare a new font in the UIText class itself.
I mainly used these two video’s as guideline but made the UIText class myself! Video 1 - Video 2 The way they prepare the data that is needed to render a font helped me a lot!
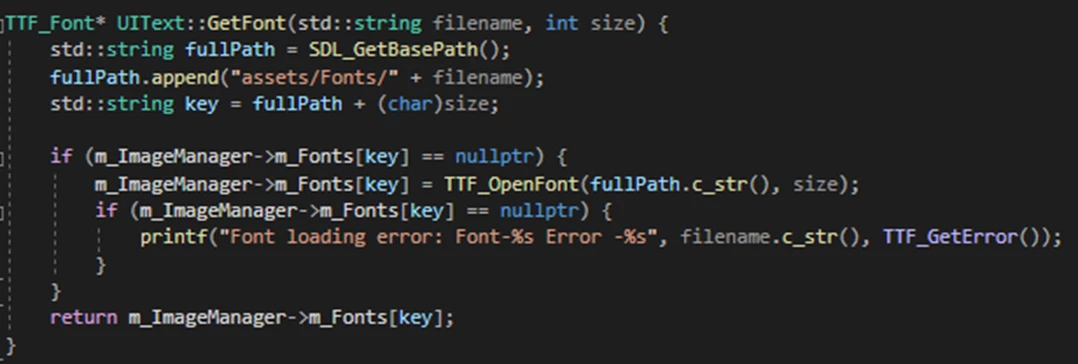
I use a map in the ImageManager to store the fonts as m_Fonts. In the UIText class, I use a function called GetFont. I first get and save a full path with SDL_GetBasePath as a string. Then I append the full path string with the “assets/Fonts/” + file name. The file name is the actual font name given when creating UITexts. I then create a key (for my map) which is the full path + (char)size. If this key returns a null pointer in the map (from the ImageManager), a new font is opened, created with the fullpath and saved inside the map. The same key won’t return a nullpointer in the next UIText that uses the same font. And lastly I return the right font data to be used inside the UIText.
Custom UIText class:
I will write a bit more about the custom UIText class, this class is used to create and store specific texts that are displayed on the screen.
In the constructor, all the important variables are set. The text is set as m_Text. The fontpath is set as m_FontPath. The color is set, which makes it possible to support different colors. Then the LoadText function is called.In the loadText function, mTex (SDL_Texture) is set using the GetTextFunction. In the GetText function, the GetFont function I wrote about in the previous slide is used to get a pointer to a usable font in the enemyManager.
I again create a key for the m_TextTexture map (I use a map because recreating a text texture while it was already created before would be a waste of performance).
If the specific text texture is not yet created, the usable font is used to create the needed text texture (using the CreateTextTexture function) and stored inside the map.
The Create Text Texture function creates a finalized SDL_Texture from a TTF_RenderText function, and a SDL_CreateTextureFromSurface function. After all this SDL_QueryTexture is called and the width and height is set to the SDL_Rect (rect).
Drawing the UIText:
The draw function, uses the SDL_RenderCopy to copy towards the SDL_Renderer. This uses the finalized mTex, no srcRect and a finalized SDL_Rect.
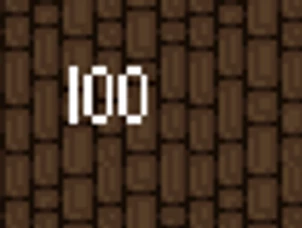
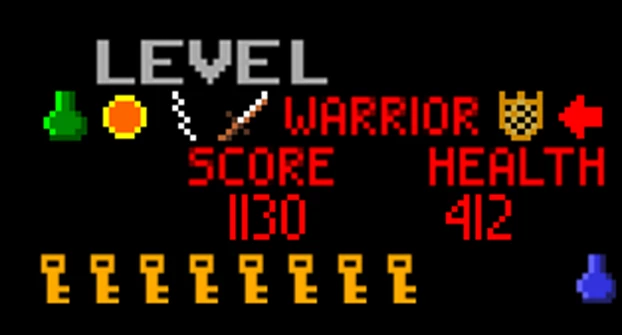
The normal draw function uses a static screen position, which is just a number between 0 and the screen width and height. An examples of the usage of these texts, are the UITexts that represent the score and the health of the active player.
The drawAtWorldPosition function calculates the final screen position according to a world position in relation to the screen world position. This draw function is used to render a text on top or at the place of a GameObject’s position.
The scores that are displayed after picking up a key/chest uses this code. This also makes sure that these text move accordingly when the camera moves.
Enabling Potions, Keys and Upgrade icons:
Afterall the static elements are set, I wrote 2 functions to add and delete icons that represent my inventory.
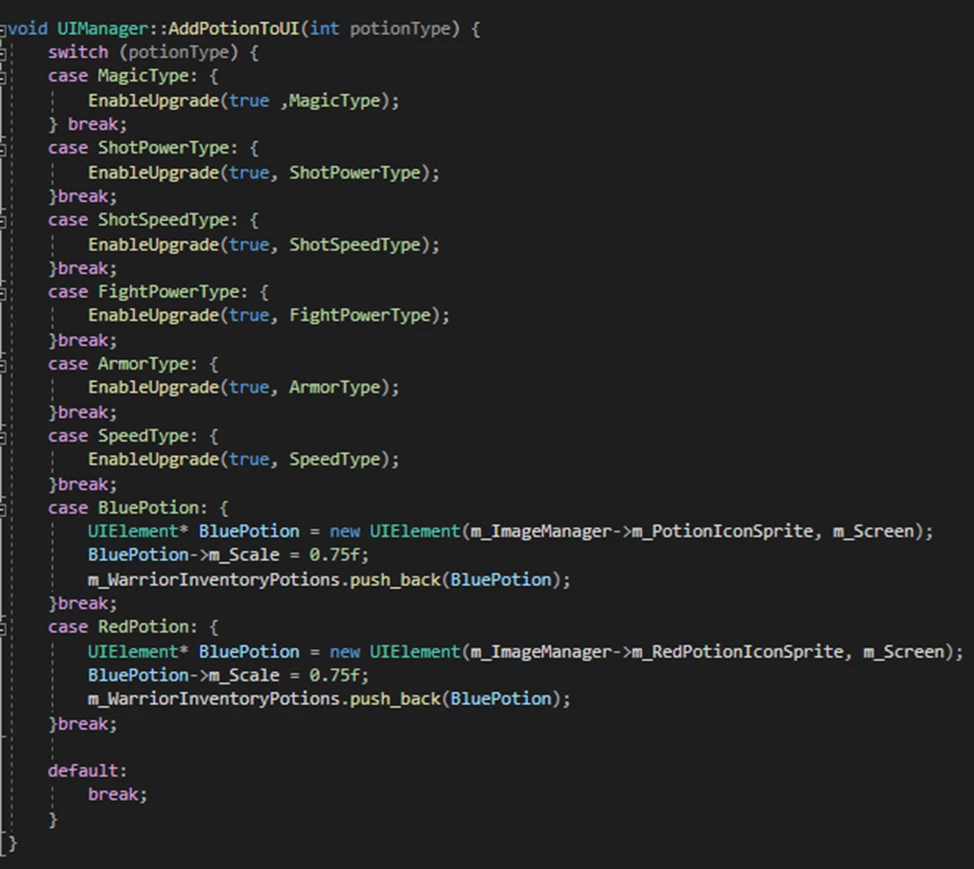
The AddPotionToUI function uses a switch case to determine if you are adding a upgrade, Blue potion, or a red potion. (in hindsight, the naming of this function should have been, EnableIcon). If you are adding a upgrade, the EnableUpgrade function is called with true as parameter and the upgrade potion type (int). Adding keys and potions works a little different. I push a new red or blue potion icon into an array called m_WarriorInventoryPotions. Adding potions can be seen in the first image of this section. I do the same for new key icons but use the m_WarriorInventoryKeys array. I keep the two separated because I use the array index to determine the position on the screen.
The cool part about how I store the added potions, is that detail is defined as a potion type. If a red potion is picked up, a red potion icon is added to the array.
For now, only the potion, upgrade and key icons are implemented for the warrior UI section, but this could be easily expanded to support the other characters.
The player select screen:
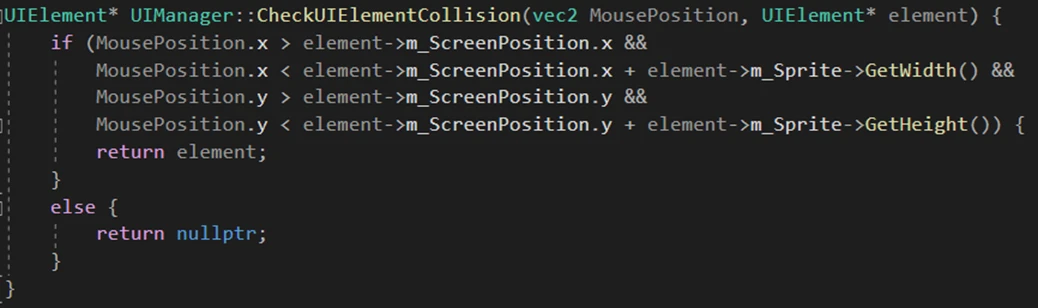
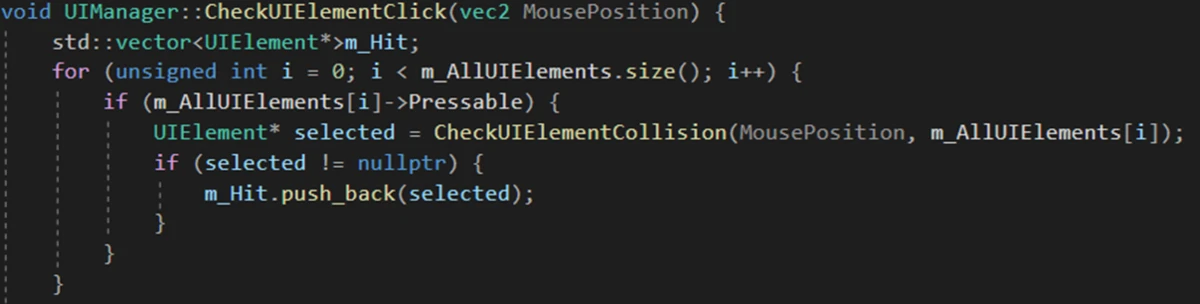
In the UIManager, I added the CheckUIElementCollision function. This uses the mouse position (when clicked) and a simple AABB calculation to check if a certain ui element is pressed.
Buttons and UI mouse detection:
The ui elements do have a OnClick function, but this is only used to check for a boolean.
Why? Because I don’t have a event system working yet. With a event system I could add the needed functionality to each created button. This would be really clean, and is planned to be implemented in the future. The functionality right now is written in the UIManager, while checking if a button is pressed. This changes the images and text to the right selected player index data.
I was implementing this to use layers as well, so the highest element would receive be pressed, However this was not yet needed, and is going to be made when implementing the event system.

 To both load in and switch levels, I created the following functions:
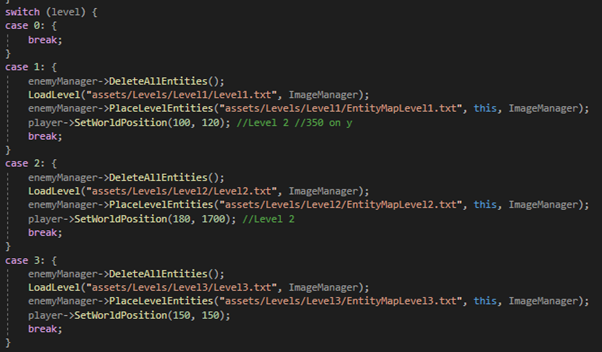
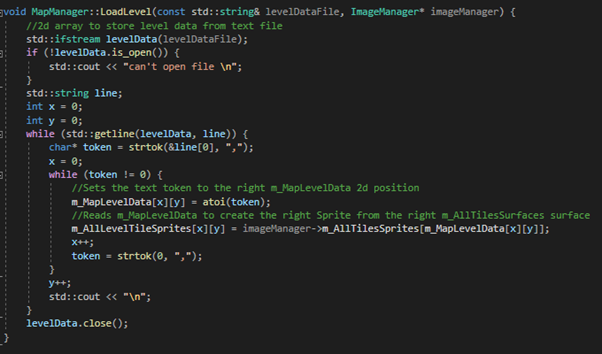

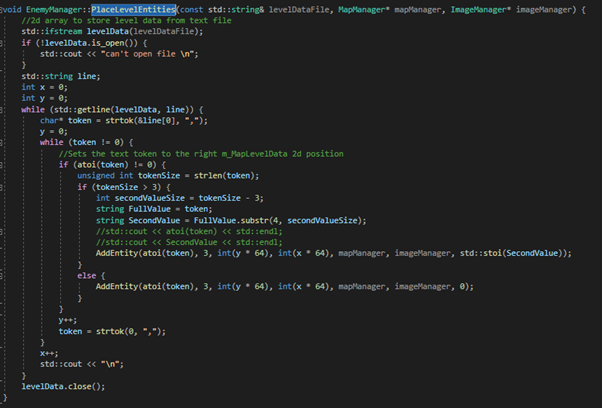 First of all, after reading the different tokens, using
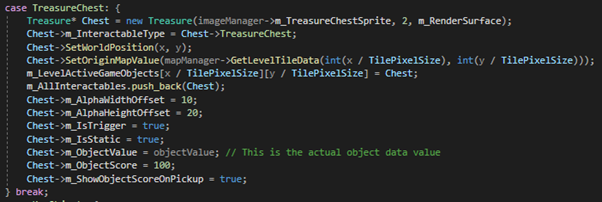 The treasure chest instantiated with all the needed game variables being set.
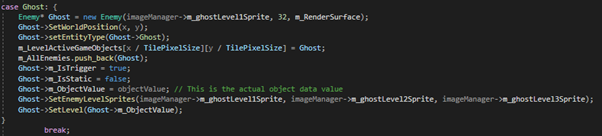 The Ghost instantiated with all the needed game variables being set.
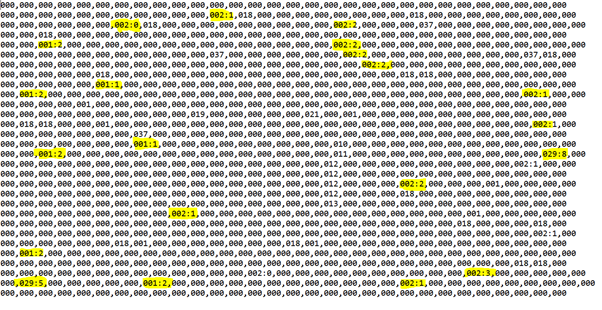 After implementing the extra value in my enemy manager PlaceLevelEntities function, I was able to add predetermined data to all the objects. Exits were now able to correctly move to the next level, and objects that could spawn with a specific difficulty such as generators also worked.


 If the player is inside this specified middle section of the teleporter, it sets the teleporter m_IsTriggered to true. It also calls the StartTeleportAnim to the player.
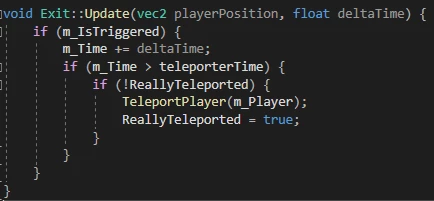 In the update, after a specified timer, which indicates if a specific player teleport frame has been played, it sets the ReallyTeleported boolean to true.
  The TeleportPlayer function, call the SwitchLevel function, in the MapManager.
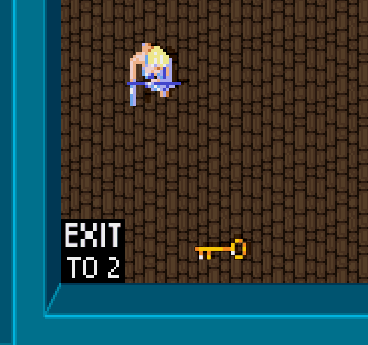
 For example, If you step into the teleporter while there is light under value 3, you get teleported towards the first nearest teleporter. And with a light value of above 3, you get teleported to the second nearest teleporter.
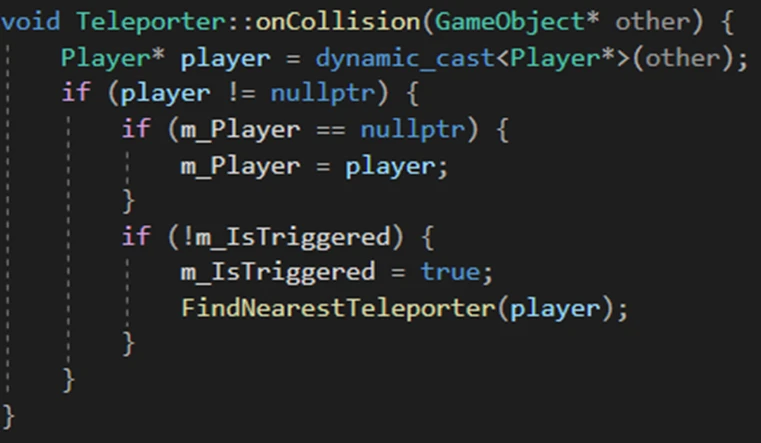 In the FindNearestTeleporter function, I determine all the closest teleporters to the triggered teleporter.
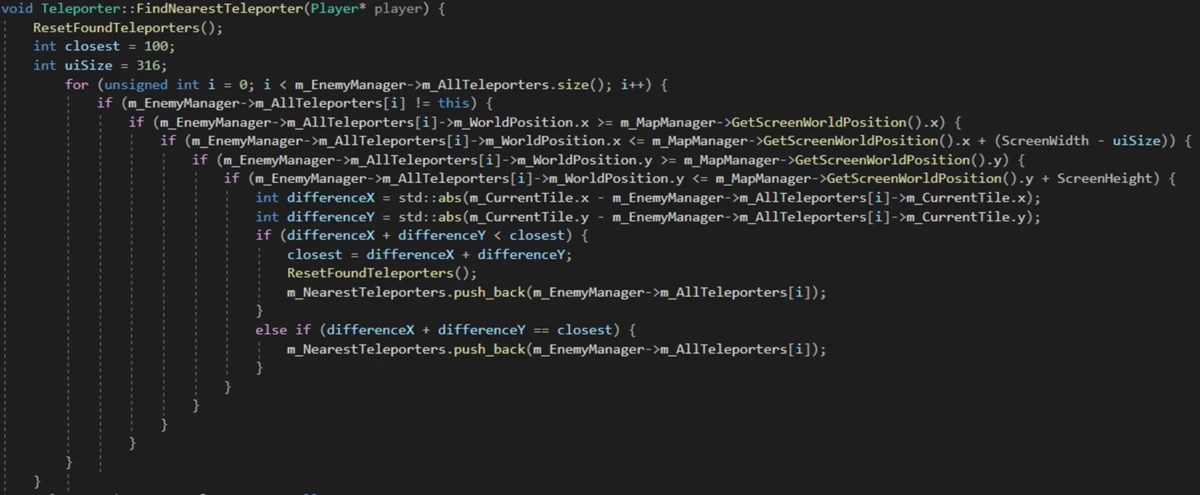 Through the enemy manager, I check all the teleporters in the level. I check if they are within the screen by checking distance from the screen world position.
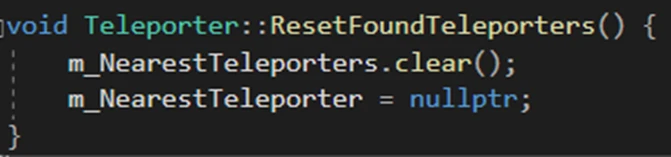 If the distance is the same as the currently closest value, I add this teleporter to the m_NearestTeleporters vector.
  By doing this, it is possible to have multiple teleporters saved as nearest teleporter.
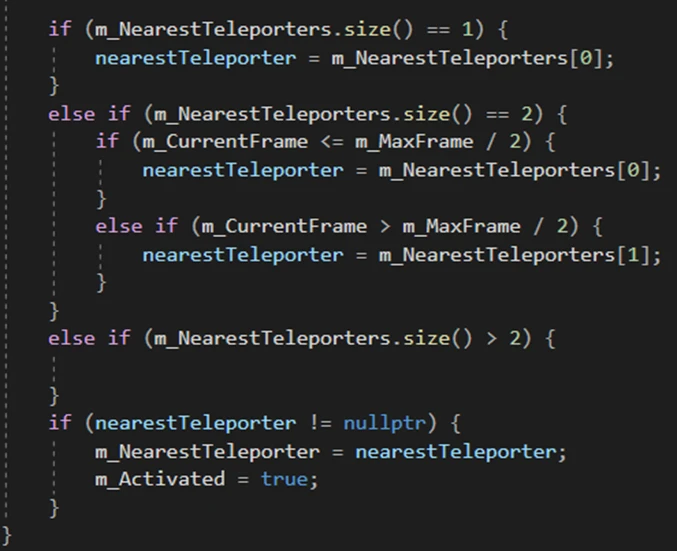 At the end of the FindNearestTeleporter, m_Activated is set to true.
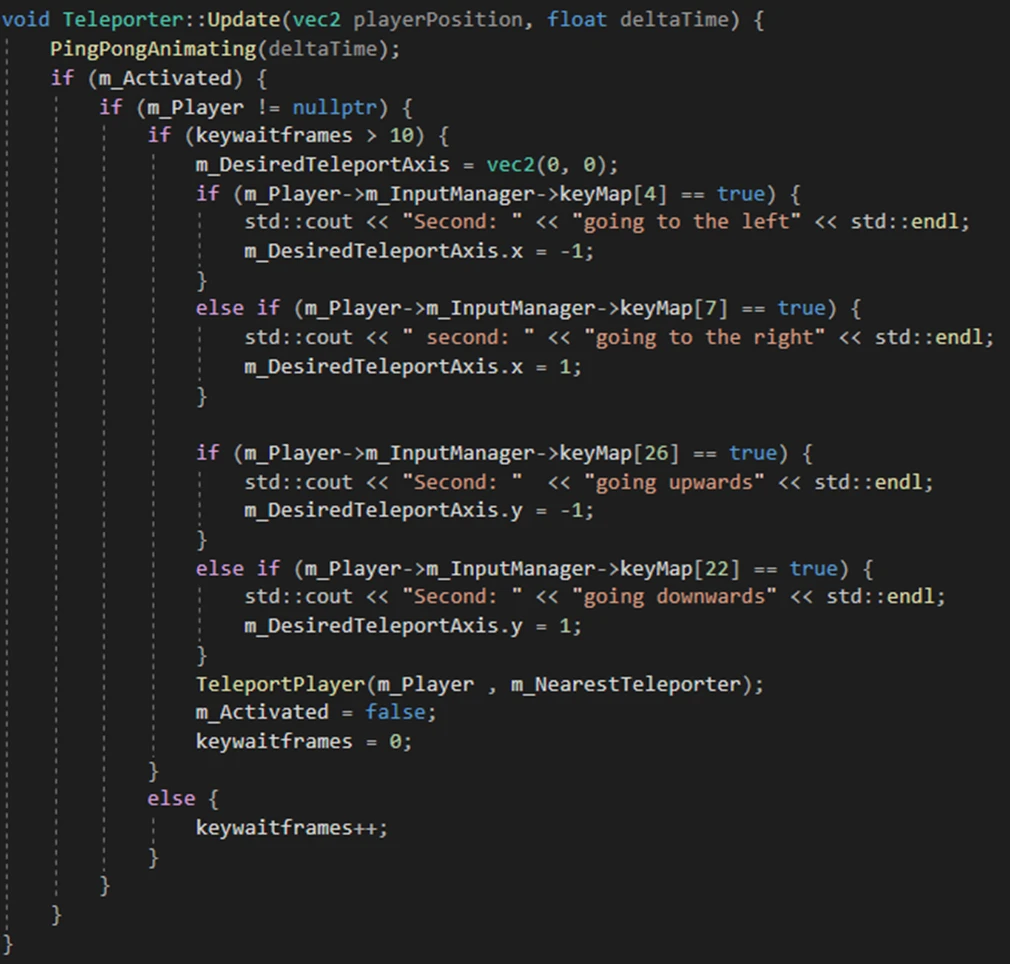 In the if else statements input is checked, and the m_DesiredTeleportAxis is set on both the X and Y axis.
 m_Activated is set to true, so that the whole loop does not start over.
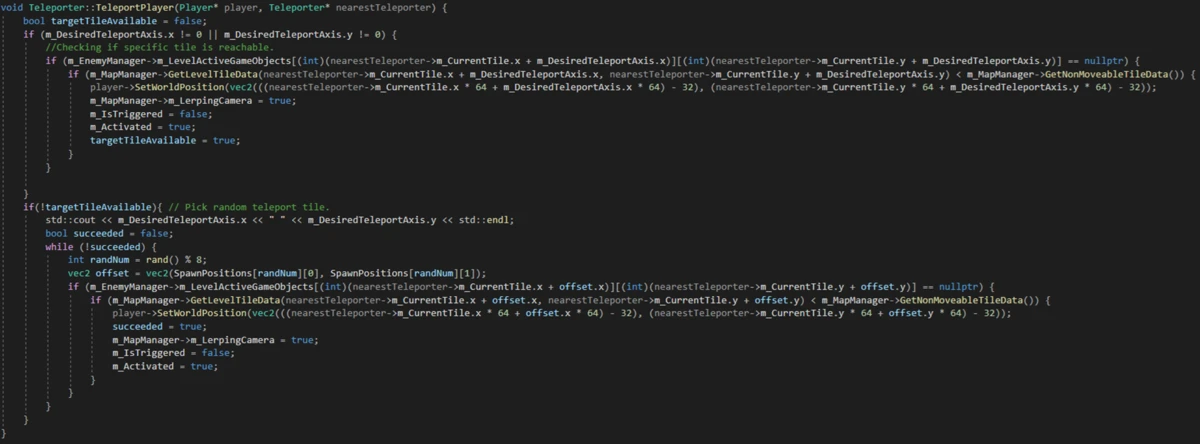


 In both the onCollision and the onTrigger, if interacted, the variable, m_Alive is set to false, which removes it from the game in the next frame.


 In the loadText function, mTex (SDL_Texture) is set using the GetTextFunction.
 I again create a key for the m_TextTexture map (I use a map because recreating a text texture while it was already created before would be a waste of performance).
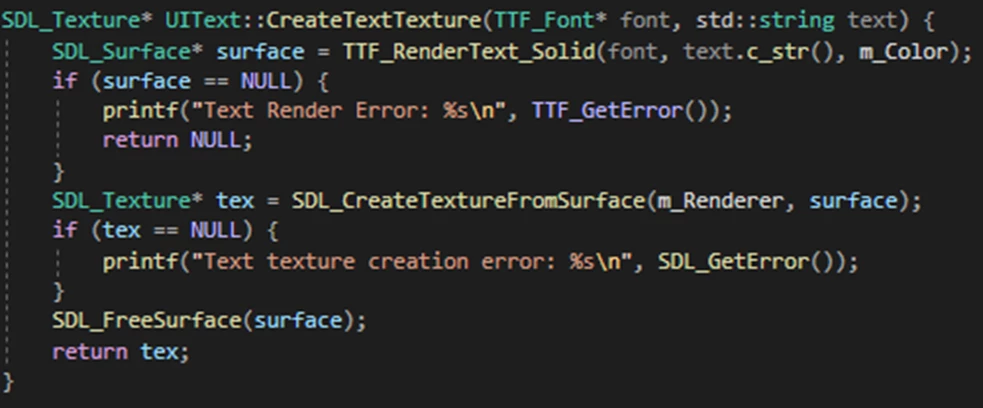 After all this SDL_QueryTexture is called and the width and height is set to the SDL_Rect (rect).
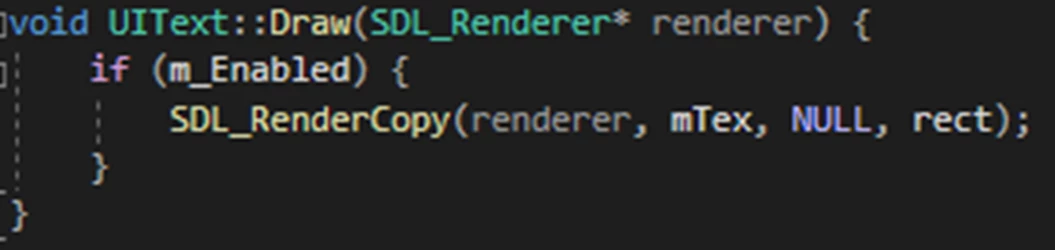
 This draw function is used to render a text on top or at the place of a GameObject’s position.